
Amazon Comprehend is a Natural Language Processing (NLP) platform available as a service on AWS. It’s a collection of pre-trained and operational NLP models that can be used with no or little coding through the point and click interface. In addition to point and click interface, you can call the services through the API directly from the terminal or python.
In this article I cover sentiment analysis and entities identification using both interfaces:
Cost.
With a free AWS tier, you can analyze up to 50K units free per month. One unit is 100 characters. In my Twitter example, every tweet was ~2 units, so doing sentiment tweet level analysis of 30K tweets was 60K units.
After your free limit of 50K units is reached, the costs is $1 per 10K units.
The limit for free S3 data storage is 5Gb, and data transfers are free. For topic modeling, you only get 5 sets of 1Mb of text free for the whole year. The free tier does not cover custom model training.
Amazon changes pricing frequently. Please see their current pricing here.
AWS Comprehend Services
I have tried out the pre-trained models by using both point-and-click interface and boto3 API. It’s possible to use point and click service without any coding, but only in simple analysis cases. A little coding goes a long way with Comprehend, though, as I was able to expand the capabilities by writing simple code to convert results or run a batch of text through in real-time.
Services available through Amazon Comprehend:
| Service | Pre-Trained | Custom |
| Language | ✓ | |
| Entities | ✓ | ✓ |
| Sentiment | ✓ | |
| Key Phrases | ✓ | |
| Syntax | ✓ | |
| Topics | ✓ | |
| PII Detection | ✓ | |
| Document Classification | ✓ |
Whether you plan to use Comprehend through point and click or API, it would be helpful to do your first project through the web interface because you will be able to create accounts, buckets, and roles that will come in handy when working through the API.
Amazon Comprehend Point and Click Web Interface
AWS can be overwhelming, so it is highly recommended that if you are a first time user, learn more about the service in general and the console in particular.
There are two ways you can use Comprehend through the web interface:
- Real-time analysis. It can be done by copying your text (an analysis unit of text is called a document) up to 5,000 bytes/characters into an input window on the site.
- Analysis job. The analysis job loads your text from uploaded files, and thus you may analyze multiple documents at once.
These are the steps you will need to do to use Amazon Comprehend through the web interface:
- If you don’t have one, create an AWS account. You can run the real-time analysis by simply launching Amazon Comprehend from the console.
- [Recommended] Create an administrator user to run all of your analysis as.
- Create an S3 bucket and upload your data to it.
- Create an Amazon Comprehend job.
- Download the results from the S3 bucket.
- Convert results into a table* for further analysis.
* This step may require some light coding depending on the complexity of the output.
Data Preparation
Comprehend analyzes plain utf-8 encoded text data, and I used a collection of 30K tweets about retailers (Walmart, Kroger, and ahem, Amazon) for my trial.
The unit of analysis is a document, and it can be defined as “one document per line” or “one document per file”.
Line breaks are defined as \n or \r, and since tweets can have line breaks in them, I had to clean them out before analysis, so my tweets don’t get broken up in the ‘one document per line’ scenario.
Working with S3 Data Storage
If you are scared, don’t be. My best description is that S3 is similar to Dropbox. Yes, there are more options, but the defaults are usually fine. The highest level folder you create is called a bucket. Folders at lower levels are just called folders.
Once you have created a free user account, you log on into the AWS Management Console, where links to all of the services are. Find S3, and go from there.
Create a bucket for your project. In that bucket, I usually create a ‘data’ folder for the data and a ‘results’ folder for the analysis output. Upload your data into the data folder.
Amazon Comprehend takes all files in the input data folder, so you can analyze multiple files at the same time. You can still analyze them by line, even if you have multiple folders. When setting up your analysis job, you should not output the results into the same folder as the data. If you decide to re-run the job, it will think your results file is another input data file, and will give you an error.
Creating an AWS Comprehend job
From the AWS Console, choose Amazon Comprehend, and then choose “Launch Amazon Comprehend. You will be taken to the Real Time analysis page, where you can paste your text and analyze it using pre-built models on the spot.
To launch an analysis job that takes inputs from the S3 storage, choose the Analysis Jobs link in the left menu. You will be taken to the list of jobs, where you can create one.

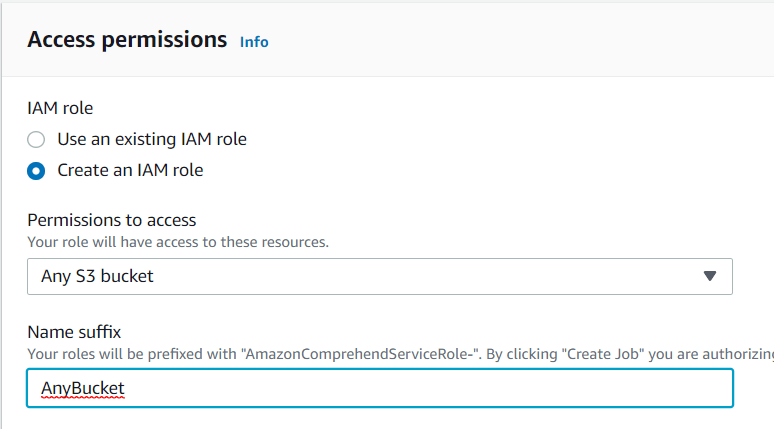
When you are doing it for the first time, you will be asked to create a role for the job. For jobs to have roles is a concept I have not been familiar with, but basically, it gives the job access to the S3 bucket. I created a role that could access all of my buckets.
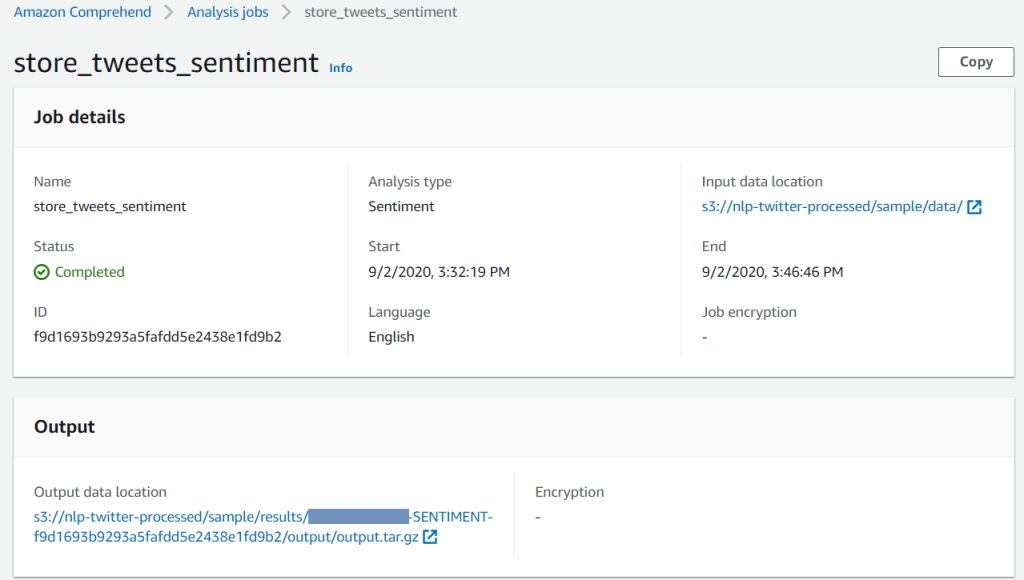
Once the job runs, you will see that it turned Completed in the list. It’s time to get the results! Click on the job, and you will see a link to the results file.
Processing the results
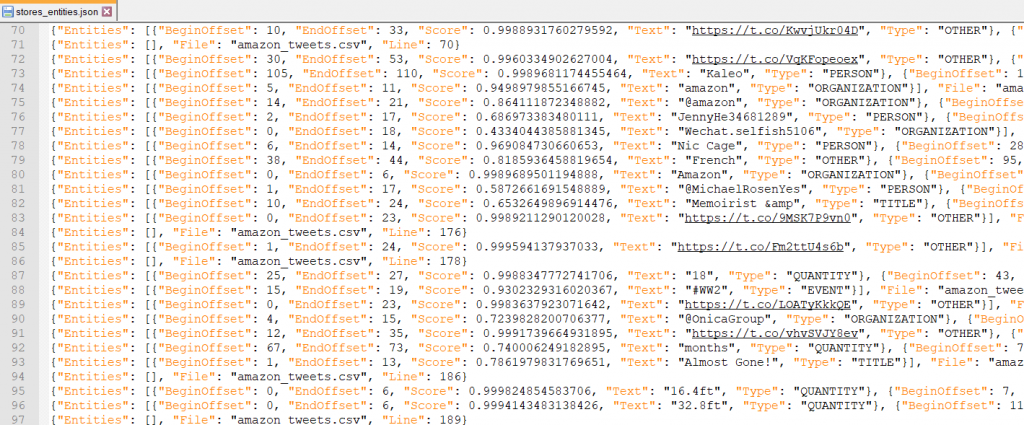
Once you download and unzip the file, this is how a typical output looks like. It’s in a format that is called a data dictionary or JSON.
If you have a simple analysis that has just one JSON line, you might be able to use web or other tools to convert the file into a table.
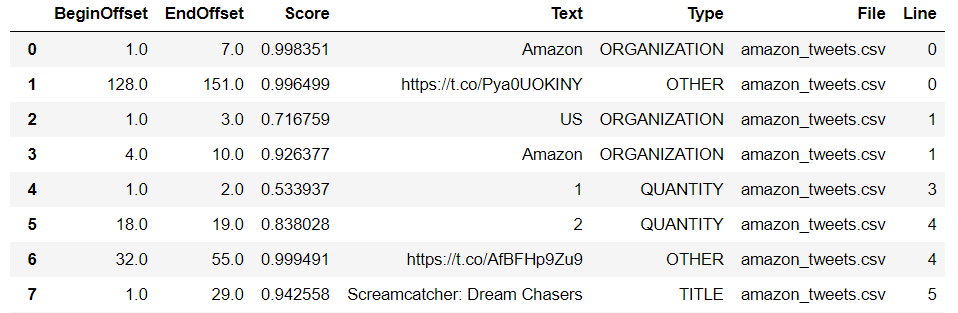
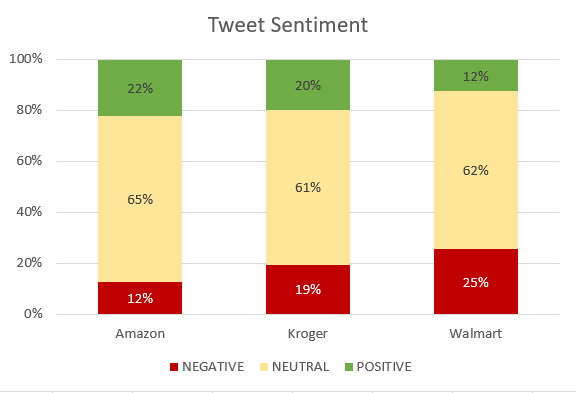
I wrote some simple python code to convert the outputs into tables, which you can find in my Github repository. Above is how the output looks like in pandas, and you can export it into .csv for analysis in Excel.
I switched to Excel and produced this comparison chart of tweet sentiments for three different store types.
AWS Comprehend through BOTO3 API for Python
If you are interested in using Amazon Comprehend through the API and have some experience with python, it is definitely worth it. BOTO3 is the package, and it lets you run the following operations directly from your code/notebook: creating buckets, uploading data, downloading the results, running real-time analysis of a single document, running a real-time batch of 25 documents (no S3 interaction needed), and scheduling jobs.
There are three ways you can run NLP analysis using BOTO3 API:
- Single document processing. A document can be up to 5,000 bytes.
- A batch of up to 25 documents, sent as a list.
- Scheduling an AWS Comprehend job and using S3 storage to submit inputs and save results.
Sentiment Analysis in Amazon Comprehend
Sentiment analysis is a type of classification modeling using Natural Language Processing. In Amazon Comprehend, you can use both console and BOTO3 API for Python to perform sentiment analysis. In this video, I show how to perform it step-by-step.
Preparation steps for using Comprehend through the API
- Create an account at Amazon AWS.
- Create an admin user in IAM and get the access keys.
- Install AWS Command Line Interface (AWS CLI) and configure it to use your access keys.
- Create an S3 bucket for your data and output files [need this for Comprehend jobs].
- Install python packages: boto3, pandas, json, tarfile.
There are two ways to use AWS Comprehend python API:
- Real-time, when you submit the data directly from python and get the results back into python. This works for single document processing or the batch analysis of up to 25 documents.
- A Comprehend Job, which analyzes the data saved to your S3 buckets and outputs the result there.
The code for both ways of using the API is in my GitHub.
Summary of BOTO3 Functions by Task Type
S3 – Reference: https://boto3.amazonaws.com/v1/documentation/api/latest/reference/services/s3.html
Client: s3 = boto3.client(‘s3’)
Upload: s3.upload_file(local_file_name, bucket_name, aws_file_name)
Download: s3.download_file(bucket_name, results_aws_filename, local_results_filename)
Amazon Comprehend
Reference: https://boto3.amazonaws.com/v1/documentation/api/latest/reference/services/comprehend.html
Client: comprehend = boto3.client(service_name = ‘comprehend’, region_name = your_region)
Sentiment Analysis
Single Document Sentiment Analysis:
response = comprehend.detect_sentiment(
    Text = document_text,
    LanguageCode = 'en')
Batch of up to 25 Documents Sentiment:
response = comprehend.batch_detect_sentiment(
    TextList = document_list,
    LanguageCode = 'en')
Create Sentiment Analysis Job:
response = comprehend.start_sentiment_detection_job(
    InputDataConfig = input_data_config,
    OutputDataConfig = output_data_config,
    DataAccessRoleArn = data_access_role_arn,
    LanguageCode = 'en')
Entities Detection Analysis
Single Document Entities Detection:
response = comprehend.detect_entities(
    Text = document_text,
    LanguageCode = 'en')
Batch of Up to 25 Documents:
response = comprehend.batch_detect_entities(
    TextList = document_list,
    LanguageCode='en')
Create Entities Detection Analysis Job:
response = comprehend.start_entities_detection_job(
    InputDataConfig = input_data_config,
    OutputDataConfig = output_data_config,
    DataAccessRoleArn = data_access_role_arn,
    LanguageCode = 'en')
Other analysis functions follow a similar pattern.
Let’s go into detail and create a Comprehend Analysis Job in python.
NLP by creating Amazon Comprehend job through the API using python
- Prepare your data. I used Twitter API to create a .csv file for specific queries. My data prep code is posted here.
- Upload your data into S3 bucket.
- Create analysis job.
- Run analysis job.
- Download results from S3 bucket.
- Process the JSON output to understand the results.
1. Get Twitter data for AWS Comprehend
Twitter data is really good for NLP, sentiment analysis in particular, because it comes pre-cut into chunks of up to 240 characters that stand on their own. Because of that you can do analytics on a single tweet.
To get Twitter data, you need to open a regular Twitter account first, and then request access to their API. Twitter API python library is called tweepy. The free version has some restrictions, like the function I use to pull tweets is limited to the last 7 days.
Below is how I got tweets that include a name of a retailer of interest. If you would like to do an analysis on a retailer with a common word name like Target, my recommendation is to save all tweets first, and then run named entities recognition analysis on them, and filter for an organization named Target.
# Define your query

query = "kroger -filter:retweets"

# Initiate the list and populate it with data
tweets = []
for tweet in tweepy.Cursor(api.search,
                           q=query,
                           count=100,
                           lang="en",
                           tweet_mode="extended").items(10000):
    tweets.append(tweet._json)
Now that we have the data, let’s process it into a neat Pandas dataframe:
tweet_df = pd.DataFrame()

for i in range(len (tweets)):
    retweet_name = ''
    try:
        x = tweets[i]['retweeted_status']['full_text']
        retweet = True
        retweet_name = tweets[i]['retweeted_status']['user']['screen_name']

    except KeyError:
        x = tweets[i]['full_text']
        retweet = False
        retweet_name = ''
    df = pd.DataFrame({'user': tweets[i]['user']['screen_name'],
                       'id_str': tweets[i]['id_str'],
                       'created_at': tweets[i]['created_at'],
                       'source': tweets[i]['source'],
                       'in_reply_to_screen_name': tweets[i]['in_reply_to_screen_name'],
                       'full_text':x,
                       'rt': retweet,
                       'rt_name': retweet_name}, index = [i])
    tweet_df = tweet_df.append(df)
Once we have done it, we need to delete line breaks that happen within the tweets. The reason why we need to do it because most of Twitter analysis is “one document per line”, and AWS Comprehend considers intra-tweet line breaks the same as a break between tweets.
tweet_df.full_text = tweet_df.full_text.str.replace('\n', ' ')
tweet_df.full_text = tweet_df.full_text.str.replace('\r', ' ')
Now that our data is ready, let’s upload it to our S3 bucket.
2. Upload data to S3 bucket using BOTO3 python API
There are the packages you need to work with BOTO3 in python:
import boto3
from botocore.exceptions import ClientError
import pandas as pd
import json
import tarfile
Amazon provides a convenient S3 BOTO3 reference here. Before you upload your data, you need to create your bucket, which I have done using web interface.
# Define your files and locations
bucket_name  = 'comprehend-api'
local_file_name = 'Comprehend/amazon_tweets.csv'
aws_file_name = 'input-data/amazon_tweets.csv'

# Upload
s3 = boto3.client('s3')
s3.upload_file(local_file_name, bucket_name, aws_file_name)
Note that I put my data into a folder called ‘input-data’ in the bucket called ‘comprehend-api’. And ‘Amazon’ in the data file name refers to Amazon as a retail company.
3. Create and run AWS Comprehend analysis job using BOTO3 API
In this example, I will create a named entitles detection job.
First, let’s set up the main parameters. If you have already created a job using the web interface, then you have created the ARN data access role. To look it up, open your analysis job, scroll to Application Integration, and you will find it in the API Response section.
# Set these values before running the code
input_s3_url = 's3://comprehend-api/input-data'
input_doc_format = 'ONE_DOC_PER_LINE'
output_s3_url = 's3://comprehend-api/results'
data_access_role_arn = 'arn:aws:iam::XXXXXXXXX:role/service-role/YOUR_ROLE_NAME'
number_of_topics = 10   # Optional argument

# Set up job configuration
input_data_config = {'S3Uri': input_s3_url, 'InputFormat': input_doc_format}
output_data_config = {'S3Uri': output_s3_url}
Now that you have your values set up, it’s time to rock and roll:
# Start a job to detect the entities in the document collection
comprehend = boto3.client('comprehend')
start_job_entities = comprehend.start_entities_detection_job(
    InputDataConfig=input_data_config,
    OutputDataConfig=output_data_config,
    DataAccessRoleArn=data_access_role_arn,
    LanguageCode='en')
job_id = start_job_entities['JobId']
print(job_id)
To check the status of the job:
# Retrieve information about the job
describe_result = comprehend.describe_entities_detection_job(JobId=job_id)
job_status = describe_result['EntitiesDetectionJobProperties']['JobStatus']
print(f'Job Status: {job_status}')
if job_status == 'FAILED':
    print(f'Reason: {describe_result["EntitiesDetectionJobProperties"]["Message"]}')
Once the job status turns into COMPLETED, you can download and process the results.
4. Download the results from your S3 bucket
First, you need to find the name of the file and the location or S3Uri where the results are stored.
entities_results_S3Url = comprehend.describe_entities_detection_job(
    JobId=job_id
)['EntitiesDetectionJobProperties']['OutputDataConfig']['S3Uri']
s3_name = 's3://' + bucket_name + '/'
results_aws_filename = entities_results_S3Url.replace(s3_name, '')
Then, download the results file into your local folder:
# Local file name
local_results_filename = 'Comprehend/outputs/entities.tar.gz'
# Download the results
s3 = boto3.client('s3')
s3.download_file(bucket_name,
                 results_aws_filename,
                 local_results_filename)
5. Process the results JSON
Step One of converting the results into a neat dataframe is to unzip them using tarfile package.
def extract_targz(targz_file, output_path = ''):
    if targz_file.endswith("tar.gz"):
        tar = tarfile.open(targz_file, "r:gz")
        tar.extractall(path = output_path)
        tar.close()
    elif targz_file.endswith("tar"):
        tar = tarfile.open(targz_file, "r:")
        tar.extractall(path = output_path)
        tar.close()

# Unzip the results file
output_path = 'Comprehend/outputs/extracted'
extract_targz(local_results_filename, output_path)
Step Two is to convert JSON into a pandas dataframe.
# Read JSON into a dictionary
input_file = output_path + '/output'
entities = [json.loads(line) for line in open(input_file, 'r')]

# This function parses entities data into a dataframe
def parse_entities(data):
    df = pd.DataFrame() # declare an empty dataframe
    nested_json = 'Entities' # nested sub-dictiptionary to extract data from
    # populate the dataframe
    for line in data:
        dt_temp = pd.DataFrame(line[nested_json])  # extract data from sub-dictionary
        other_fields = list(line.keys())
        other_fields.remove(nested_json) # remove nested fields
        for field in other_fields:  # add common fields
            dt_temp[field] = line[field]

        df = df.append(dt_temp, ignore_index = True)

    return(df)
If you have run a sentiment job, the following function can be used to convert JSON output for sentiment analysis:
# This function parses sentiment data into a dataframe
def parse_sentiment(data):
    df = pd.DataFrame()
    for line in data:
        try:
            dt_temp = pd.DataFrame(line['SentimentScore'], index = [0])
            for field in list(line.keys())[:-1]:
                dt_temp[field] = line[field]

            df = df.append(dt_temp, ignore_index = True)

        except:
            for field in list(line.keys())[:-1]:
                dt_temp[field] = line[field]

            df = df.append(dt_temp, ignore_index = True)

    return(df)
Have fun analyzing the data!
The main advantage of the API is not having to switch and touch multiple systems. You can prepare the data, test it in a small batch in real-time, save, upload, launch a job, download the results, and of course analyze them, all from the same notebook.
Conclusion
Amazon Comprehend is a set of powerful NLP models that can be used with little to no coding. The models are good at identifying text sentiment, a limited number of entities, document language, and sentence structure. I found key phrases analysis to me overly sensitive (aka too many phrases were identified) and topic analysis produced very confusing results.
Point and click interface makes scheduling analytical jobs easy, and it is good for occasional use, even if you have to analyze a large corpus split into multiple files.
API interface is fairly straightforward and should be considered for use by technically advanced analysts for repeated analysis of text or for use in production.
Custom document classification and entity detection are not free products, but they can make Amazon Comprehend deliver much better value in automation tasks.
If you would like to learn more about enhancing your data analytics capabilities with Amazon Comprehend, feel free to connect with me on LinkedIn and ask questions.